

It's not good to rely on primer to fill cracks. It is not strong enough to bond the crack together. Sure it might fill the gap but in time it will open up again. Even filling fibreglass cracks with automotive body filler is not strong enough as fibreglass moves and flexs in the heat and cold. Not to mention road vibration.
You can rely on primer or body filler to fill imperfections or pin holes but not stress points AKA cracks.
***** ALERT - Nominations for your new ClubCJ Committee can be made here *****
lukeaday's body kit install
Moderators: Moderators, Senior Moderators


Firbre renforced plastic. B/Shite!!
After washing the "cover up" primer off all I can see is a skim of grey gell coat then a thin layer of resin then some chop strand, raw in some areas then fibre glassed chop strand in the inside.
In regards to layering up over the crack from inside. I did this on the rear lip and will do the same where I can on the front lip. Maybe sneak some bird cage mesh under the fibreglass back fill.
Official ClubCJ Sponsor.


mines defiantly FRP is crude plastic shell. covered with thin fiberglass to reinforce it. making it semi flexible, mine is the same colour as the plastic of the side skirts but has fiber over it. mine is pretty flexible, if yours flexes at all then its FRP or extremely thin fiberglass(and would just snap in half). if its was only fiberglass then it would be very very solid.
IF YOUR NOT LIVING ON THE EDGE YOUR TAKING UP TOO MUCH ROOM
Blakey. Have you sanded back any of the grey primer on the front and rear lip yet.
When I washed the primer off the front bar today there were heaps of filled pin holes and imperfections.
Is there any chance you could post a pic of your kit?
I will post a pic of my striped front lip and show you that it is fibreglass all the way. No plastic. I know the smell of fibreglass and plastic when you hit it with a grinder and I could not smell and plastic.
P.S. The side skirts are vacuum formed ABS
Look closely and you will see the suction hole dimples in all of the low areas. There is a row of about 10 of them. Make sure you fill and sand them or else they will show up in the final paint work!
Official ClubCJ Sponsor.
lukeaday wrote:Blakey. Have you sanded back any of the grey primer on the front and rear lip yet.
When I washed the primer off the front bar today there were heaps of filled pin holes and imperfections.
Is there any chance you could post a pic of your kit?
I will post a pic of my striped front lip and show you that it is fibreglass all the way. No plastic. I know the smell of fibreglass and plastic when you hit it with a grinder and I could not smell and plastic.
P.S. The side skirts are vacuum formed ABS
Look closely and you will see the suction hole dimples in all of the low areas. There is a row of about 10 of them. Make sure you fill and sand them or else they will show up in the final paint work!

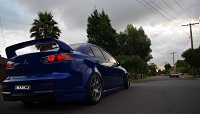
thats mine. from the back.
and i haven't done anything besides test fit the front and sides of right now iv been to busy and cant get help to get it done

OK. Time to fit the rear lip 
Here it is siting behind the car.

I did another dry fit just to get remind myself where it fits.

Here it is siting behind the car.
I did another dry fit just to get remind myself where it fits.
Last edited by lukeaday on Sat Jan 02, 2010 2:44 pm, edited 1 time in total.
Official ClubCJ Sponsor.

Sit tight mate. Got heaps of posting to come!!!
Next was to remove the lip and clean the inside with wax and grease remover/presol.
Then I got some of this stuff.
I purchased it from Bunnings. Half the price as Sikaflex and it does exactly the same job.
I ran a very thick bead along the top edge of the inside of the lip as well as some large blobs on areas that I thought would come close to contacting the OEM bumper.
After doing the I fitted the lip and taped it back in place not worrying about excess adhesive coming out like this.
Official ClubCJ Sponsor.
Sit tight mate. Got heaps of posting to come!!!
Next was to remove the lip and clean the inside with wax and grease remover/presol.
Then I got some of this stuff.

I purchased it from Bunnings. Half the price as Sikaflex and it does exactly the same job.
I ran a very thick bead along the top edge of the inside of the lip as well as some large blobs on areas that I thought would come close to contacting the OEM bumper.
After doing the I fitted the lip and taped it back in place not worrying about excess adhesive coming out like this.

Next was to remove the lip and clean the inside with wax and grease remover/presol.
Then I got some of this stuff.
I purchased it from Bunnings. Half the price as Sikaflex and it does exactly the same job.
I ran a very thick bead along the top edge of the inside of the lip as well as some large blobs on areas that I thought would come close to contacting the OEM bumper.
After doing the I fitted the lip and taped it back in place not worrying about excess adhesive coming out like this.
Official ClubCJ Sponsor.

Who is online
Users browsing this forum: No registered users and 18 guests