***** ALERT - Nominations for your new ClubCJ Committee can be made here *****

Interior Front Reading Lights

Lancer Interior Modifications.

Moderators: Moderators, Senior Moderators

reverendmarty
Lancer Newbie
Lancer Newbie
Posts: 22
Joined: Tue Dec 24, 2013 12:47 pm
Location: Brisbane, Australia

Postby reverendmarty » Wed Jan 08, 2014 6:27 pm

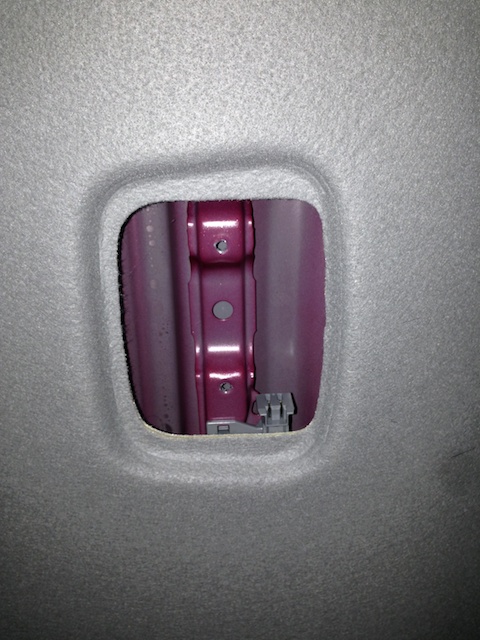
delta_fragma wrote:The blade connector on the bottom right corner of this pic has +12v and ground. It should unclip and pull out far enough to be able to tap 2 wires to run to the front. [img:b55a588034]http://www.clubcj.net/img/images/20131124121715_IMG_2933.jpg[/img:b55a588034]


How do you get that damn blade connector out of the roof, that four way clip is the devil.

User avatar
4B11LA
Lancer Newbie
Lancer Newbie
Posts: 24
Joined: Wed Mar 06, 2013 8:42 pm
Location: sydney, Australia

Postby 4B11LA » Sun May 04, 2014 8:35 am

If you need the genuine wiring from the roof light down to the etacs ecu or fuse box passengers foot well I have that surplus to my needs also the actual light it self 2012 VR platinum
Pm me

User avatar
lantourismo
Lancer Legend
Lancer Legend
Posts: 1248
Joined: Sat Apr 13, 2013 8:32 pm
Location: Perth, Australia

Postby lantourismo » Sun May 04, 2014 8:38 am

reverendmarty wrote:[quote:d0cc60359d=delta_fragma]The blade connector on the bottom right corner of this pic has +12v and ground. It should unclip and pull out far enough to be able to tap 2 wires to run to the front. [img:b55a588034]http://www.clubcj.net/img/images/20131124121715_IMG_2933.jpg[/img:b55a588034][/quote:d0cc60359d] How do you get that damn blade connector out of the roof, that four way clip is the devil.


Easiest way is to pull the roof lining down from the front, invest In a trim removal tool, the sun visor clips are nasty things to remove with a screwdriver

User avatar
ben.sargent
Lancer Learner
Lancer Learner
Posts: 2
Joined: Fri Dec 29, 2017 2:11 pm

Re: Interior Front Reading Lights

Postby ben.sargent » Wed Jan 10, 2018 10:04 am

Hey Guys, I know this is an old thread so sorry in advance for newb questions. Just acquired a 2010 Es sedan and put map lights in last night. I have the issue where they will only come on with doors and would like to source constant 12v so I can use them anytime. Dome light has no wiring itself when removed, it slips out of/into a clip which is attached to the dome roof bracket. The dome roof clip has 2 wires coming out the back which are black and black with a white stripe. I noticed one of the screws is a ground as well. I tapped the 2 black/black+white stripe wires from the A pillar and ran wiring under roof lining to the front map light as there is no flex in the dome light loom at all nor can I get fingers in to disconnect them from the clip. I referred to previous thread images for map light wiring and I have the yellow disconnected at present which is ACC however, would like to hook up 12V constant so I can use anytime. Can anyone point me in the direction of a 12v constant located in passenger fuse box with noting colors that I can tap? It is easier to run wiring up from there than from the centre dash/console. Thanks.

Mooman
Lancer VRX/GTS
Lancer VRX/GTS
Posts: 340
Joined: Wed Aug 12, 2015 12:29 pm
Location: Melbourne, Australia

Re: Interior Front Reading Lights

Postby Mooman » Thu Jan 11, 2018 7:05 am

Are they the proper lancer lights in the front? If so you can turn them on by pressing in the clear lens at the indent on either side.

Image

User avatar
aspir3
Site Admin
Site Admin
Posts: 8415
Joined: Tue Oct 27, 2009 6:15 pm
Location: adelaide

Re: Interior Front Reading Lights

Postby aspir3 » Thu Jan 11, 2018 5:21 pm

They should have powers to them all the time. They are controlled by the earth.
Did you fit an earth to it?

User avatar
ben.sargent
Lancer Learner
Lancer Learner
Posts: 2
Joined: Fri Dec 29, 2017 2:11 pm

Re: Interior Front Reading Lights

Postby ben.sargent » Thu Jan 18, 2018 2:53 pm

Thanks for reply guys, Mooman, yes they are the correct lights and yes the clear lens is the switch however only functions when doors are open and yes i've switched the middle grey switch to test. Aspir3 I tried earthing the yellow wire to the body but made no difference. I'm assuming I've wired incorrectly but don't want to fry anything so haven't tried changing connections etc. Does anyone know what the black solid wire and black wire with white stripe are? I don't have much experience with wiring. Tested one of them for 12v which is present but only shows when doors are opened then goes out with fadeout so there's some sort of system controlling it, it's not a constant. Cheers.

Mooman
Lancer VRX/GTS
Lancer VRX/GTS
Posts: 340
Joined: Wed Aug 12, 2015 12:29 pm
Location: Melbourne, Australia

Re: Interior Front Reading Lights

Postby Mooman » Fri Jan 19, 2018 6:13 am

Here's a circuit diagram, black is ground and there should be yellow and red going to light. Or going off the rear dome light it's a black wire to pin 3 and a black/white to pin 2 using plug output D-02. Wire colours are only a guide as things can/do change so to be sure a multimeter is recommended.

Image

Zoom in to make details clearer.
Image

User avatar
mrlancealot
Lancer Newbie
Lancer Newbie
Posts: 77
Joined: Wed Nov 08, 2017 8:44 am
Location: Sydney

Re: Interior Front Reading Lights

Postby mrlancealot » Wed Oct 03, 2018 5:12 pm

How do you get that damn blade connector out of the roof, that four way clip is the devil.


Has anyone managed to un-clip the gray connector without removing the interior roof lining?

Image
08 CJ Lancer ES, VR booty, VRX wheels
* Adj Strut Bar
* K&N Air Panel filter

User avatar
mrlancealot
Lancer Newbie
Lancer Newbie
Posts: 77
Joined: Wed Nov 08, 2017 8:44 am
Location: Sydney

Re: Interior Front Reading Lights

Postby mrlancealot » Mon Feb 25, 2019 9:24 am

I've figured out how to remove the Interior Dome Light connector.

https://imgur.com/a/6C8OBeQ

You need:
* A Dashboard trim removal tool (DTRT)
* 2mm/3mm wide flat head screw driver (FHSD)

Before we begin, remove light cover and light bracket. Easy.

Next we try to remove the connector.

The connector is attached to the car body using 4 push clips (not sure if this is the correct terminology).
This is very hard to remove directly by hand.

[*] Wedge DTRT between car rib* and connector. Just place it there. Don't exert force.
[*] Use FHSD, push in the clip closest to you
[*] While clip is pushed, lift the connector out of the socket using the DTRT
[*] You will see that the connector is now unseated on one side
[*] Once one side is unseated, let go of the FHSD
[*] Hold the DTRT in place, making sure the unseated side does not slip back into the socket
[*] Next, use the FHSD to push in on the clip on the right (more convenient than left)
[*] The force you exert on the right, causes both the left and right clip to move in
[*] Use this advantage to apply more force on the FHSD to pry the connector out. It won't come out straight away.
[*] You will find that the clip furthest to you will be the most stubborn (Because you can't access it directly)
[*] Apply a bit more force on the DTRT and the connector will come out

Definition:
* Car rib: the structural item in the vertical position in the picture

**Note**
Once connector is removed out of its socket, do not pull on connector. There does not seem to be any slack on the wires leading to the connector.
Attachments
WP_20190225_09_12_34_Pro.jpg
WP_20190225_09_12_34_Pro.jpg (299.96 KiB) Viewed 17959 times
08 CJ Lancer ES, VR booty, VRX wheels
* Adj Strut Bar
* K&N Air Panel filter


Return to “Interior”

Who is online

Users browsing this forum: No registered users and 43 guests