***** ALERT - Nominations for your new ClubCJ Committee can be made here *****

What is a Galant Fortis?

Start a Topic! Have Your Say & Talk About Anything.

Moderators: Moderators, Senior Moderators

SIR-VRX
Genius
Genius
Posts: 7244
Joined: Mon Oct 06, 2008 11:16 pm
Location: Brisbane, QLD, Australia

What is a Galant Fortis?

Postby SIR-VRX » Mon Jun 14, 2010 3:55 pm

There has been some discussion abut the Mitsubishi Galant Fortis and some people may not know about it, so this thread aims to inform people about them!

Mitsubishi decided for some reason to call the Lancer by the name of Galant Fortis in it's home country of Japan.

There is much alike between our AUDM Lancer and the JDM Galant Fortis, however their spec levels are vastly different to ours:

Sedan:

1. Exceed
2. Super Exceed
3. Super Exceed Navi Package
4. Sport
5. Sport Navi Package
6. Ralliart

Sportback:

1. Touring
2. Sport
3. Ralliart

I won't bore you with the differences between specs, but have a flick through the following PDF brochure if you like, you probably can't read most of it but pictures explain a lot. Don't look too close if you are jealous of the Colour LCD in the instrument cluster available here only in the MY10 Evo!

Galant Fortis Brochure

As with any Japanese car, the options and accessories lists are HUGE. Have a look:

Galant Fortis Genuine Accessories

I actually have 3 printed catalogues here at home, Sedan, Sportback and Ralliart. Before they combined them.

Any questions about the Galant Fortis fire away :)

User avatar
aspir3
Site Admin
Site Admin
Posts: 8415
Joined: Tue Oct 27, 2009 6:15 pm
Location: adelaide

Postby aspir3 » Mon Jun 14, 2010 4:13 pm

thanks Adrian that is great.

There are a few things I liked, that we do not have.

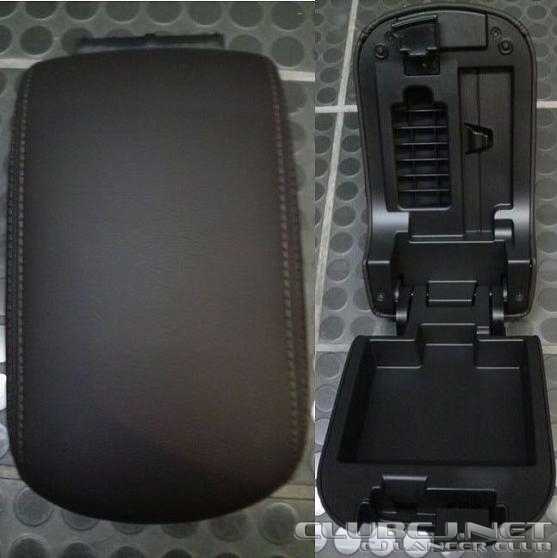
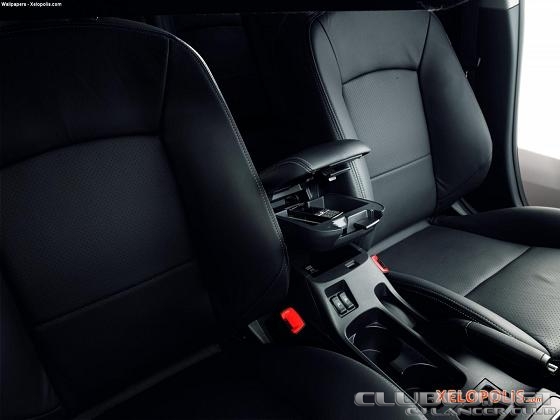
The top of the arm rest, that holds tissues. This would be great as I have kids.

Front parking sensors. I have been wanting these.

Noticed to there rear parking sensors are higher in the rear bar then owes. Owes are to low. Mine often sense the ground.

Not sure what to think about the aerials on the front corners of the car.

SIR-VRX
Genius
Genius
Posts: 7244
Joined: Mon Oct 06, 2008 11:16 pm
Location: Brisbane, QLD, Australia

Postby SIR-VRX » Mon Jun 14, 2010 4:15 pm

We have that tissue holder Troy! Have a look!

As for the aerials, they are guide poles so that the short Japs can see where the front corner of the car is. They are retractable electronically too.

User avatar
aspir3
Site Admin
Site Admin
Posts: 8415
Joined: Tue Oct 27, 2009 6:15 pm
Location: adelaide

Postby aspir3 » Mon Jun 14, 2010 4:21 pm

SIR-VRX wrote:We have that tissue holder Troy! Have a look!

As for the aerials, they are guide poles so that the short Japs can see where the front corner of the car is. They are retractable electronically too.


Yes I know we can put the tissues in the lid.

I did not explain myself correctly. They have the 2 lids.

I believe the Outlander has the same.

I could probably get one as I am sure the Outlander would fit.

I suppose the retractable aerials would be a good talking point like the folding mirrors. Unfortunately they look ugly. They just shout,"I can not drive a car, "LOOK OUT"

User avatar
SAM-24A
Alumni
Alumni
Posts: 2921
Joined: Sun May 17, 2009 4:40 pm
Location: Sydney NSW

Postby SAM-24A » Mon Jun 14, 2010 4:56 pm

Hi Troy, That Double Centre Console Lid you mentioned is pretty good, I've often thought about getting one, but they cost approx $160.

Some Pics:
Image Image

Cheers: Sam

User avatar
SAM-24A
Alumni
Alumni
Posts: 2921
Joined: Sun May 17, 2009 4:40 pm
Location: Sydney NSW

Postby SAM-24A » Mon Jun 14, 2010 5:15 pm

Hey Stacey, You just want a permanent purse in your car.

Cheers: Uncle Sam

PS: If anyone wants to hit-up Ofey for a Group Buy, count me in for one.

bd-850
Alumni
Alumni
Posts: 4486
Joined: Sat Apr 25, 2009 6:37 pm

Postby bd-850 » Mon Jun 14, 2010 5:18 pm

count me in too :P

Already contacted Ofey about this
Last edited by bd-850 on Mon Jun 14, 2010 5:37 pm, edited 1 time in total.

User avatar
Hecky
Lancer VRX/GTS
Lancer VRX/GTS
Posts: 474
Joined: Sun Dec 06, 2009 4:22 am
Location: Sydney, Australia

Postby Hecky » Mon Jun 14, 2010 5:27 pm

Funny, I was just looking at all these parts on japanparts.com (bored at work again) and this double lid and the sports meter gauges caught my attention, among others....
HKS/AMS/GFB/MRT/K&N/DBA
Whiteline/Ultra-Racing/Rexpeed/Autometer/Yokohama Racing/Cusco
...and some other stuff which the fun police don't approve of... :)

SIR-VRX
Genius
Genius
Posts: 7244
Joined: Mon Oct 06, 2008 11:16 pm
Location: Brisbane, QLD, Australia

Postby SIR-VRX » Mon Jun 14, 2010 5:41 pm

JapanParts is a great site :)

bd-850
Alumni
Alumni
Posts: 4486
Joined: Sat Apr 25, 2009 6:37 pm

Postby bd-850 » Mon Jun 14, 2010 5:46 pm

STACYS wrote:
bd-850 wrote:count me in too :P

Already contacted Ofey about this


And have you got a reply?


Gez Stacey, i know Ofey is good, but he cant work his Magic in 5 minutes :P

User avatar
Hecky
Lancer VRX/GTS
Lancer VRX/GTS
Posts: 474
Joined: Sun Dec 06, 2009 4:22 am
Location: Sydney, Australia

Postby Hecky » Mon Jun 14, 2010 5:48 pm

SIR-VRX wrote:JapanParts is a great site :)


it's a great way to spend a lazy public holiday afternoon if you're stuck at work... :D
HKS/AMS/GFB/MRT/K&N/DBA

Whiteline/Ultra-Racing/Rexpeed/Autometer/Yokohama Racing/Cusco

...and some other stuff which the fun police don't approve of... :)

User avatar
Graham
Post Monster
Post Monster
Posts: 3021
Joined: Mon May 18, 2009 6:08 pm
Location: Perth

Postby Graham » Mon Jun 14, 2010 5:50 pm

wow look at all their optional extras!

Blue illumination at the front of the car on the radiator... that's an awesome oem extra! lol
Four wheels move the body, two wheels move the soul.
ImageImage
Daily Driver: Yamaha R1
Weekend Warrior: BMW Z4 Roadster

User avatar
ofey
Alumni
Alumni
Posts: 8582
Joined: Mon Oct 27, 2008 8:56 pm
Location: Melbourne, VIC, Australia
Contact:

Postby ofey » Mon Jun 14, 2010 6:01 pm

Graham wrote:wow look at all their optional extras!

Blue illumination at the front of the car on the radiator... that's an awesome oem extra! lol


It's something you can do for much much less... Check out my solution:

ofey wrote:I'm posting this again. It seems my original DIY has disappeared.

Whilst speaking to hansmitchel yesterday I told him there was already a diy for this which I submitted but strangely I can't find it on the site.

So here's how I neon-ed my front grill again which I posted ages ago on the lancerzone forums:

So I saw Freddie's post and the JDM accessories catalogue for their Galant Fortis:
Image

I was keen to get this done.
Unlike Bro Freddie and the Japs, I used a neon tube as opposed to LEDs.

My neon tube was bought from a local company [url="http://www.aerpro.com.au/list.php?pcode=NE24B&cat_name=mobile%20lighting&cat_no=01&cat_sno="]Aerpro. 24" long[/url], water resistant and costing A$18/- after 20% discount.

And unlike Bro Freddie and the Japs, I wanted 2 ways for the nose background light to come on:
a) When the door of the car opened, so triggered by dome light circuit; &
b) An override switch next to the ASC switch, so I could turn it on when I wanted e.g. chasing down someone in the night

So I had to design an auto electronic circuit for this. Using 2 x 4 pin relays (A$10.00) , a 3m length of wire (F.O.C. take from Science Labs) to tap my battery and for jumper wire, I pulled them into the car cabin through the hole in the driver wheel arch.

I also had to tap my dome light circuitry which I found behind the panel where your front bonnet opening lever is to act as the trigger for the neon. You will also need a diode (1N4002 about A$0.25) and a capacitor (~50uF about A$0.25) to do this.

I used a 34.5x20mm switch (A$2.50) which fits perfectly in place of the dummy swith next to the ASC button as the override and a couple of 10A in line fuses (A$4.00) to complete the circuit.

I also used 8 cable ties (A$2.00), some 3M industrial double sided tape (bought for other projects), both to attach my neons behind the license plate so the glow directed towards the radiator and some plastic wiring shell to protect the exposed wiring in the engine bay (10m for A$2.50).

Here is my pin out guide for the relay assembly. (Sorry too lazy to draw it out but if you need me to send PM)
Relay 1 (To Neon):
Pin 30 = 12V Batt through 10A fuse (Line1)
Pin 85 = Grounded to body
Pin 86 = from both Pin87 Relay2 & Acc from switch
Pin 87 = to neon

Relay 2 (from dome light circuit):
Pin 30 = 12V from Batt through 10A fuse (Line2)
Pin 85 = to (gnd) of dome light circuit
Pin 86 = to (+) of dome light circuit
Pin 87 = to Pin 86 Relay1
also solder the capacitor between Pin85 & 86 to prevent chattering of the relay as the dome light circuit dims down

Switch (LED on switch best so you can see if it is on)
Power =12V from Batt through 10A fuse (Line2)
Acc = to Pin 86 Relay1 through diode
Ground = Body of car

Lots of protection from the fuses and the fact that a cascaded relay arrangement will protect the wiring I set up and the car's own.

Here's an image of my override switch:
Image

and during operation (driver door open so dome light circuit triggers neon):
Image

So total damage < A$50/- !! Way cheaper than the Japanese quotes of Y28,350 (~ A$404.75)


And yes I've already started asking about a group buy but it is apprently a public holiday here... .
Beeble tooned MY08 OEd. w/ RA BKit+SWheel
Cosworth Panel Filter w/ RA Intake | SuperCircuit 4-2-1 Headers | Creat’d Ti-tipped SS exhaust
BC BR-type Coilovers | UR + Whiteline Bars
EBC GreenStuff Pads | RDA Rotors

User avatar
lancervr
Lancer MASTER
Lancer MASTER
Posts: 1923
Joined: Sat Oct 17, 2009 2:26 am
Location: WA,Australia

Postby lancervr » Mon Jun 14, 2010 6:06 pm

man their mmcs gps images look so much cooler.... and i really like the orange led strip across the dash.... but is prohibitively expensive here as ofey said a while back... and dunno if it is available...

User avatar
Mr Bishi
INACTIVE Member Account
Posts: 21
Joined: Wed Jun 09, 2010 9:28 pm
Location: Brisbane (QLD) Australia

Postby Mr Bishi » Mon Jun 14, 2010 10:27 pm

ofey wrote:
Graham wrote:wow look at all their optional extras!

Blue illumination at the front of the car on the radiator... that's an awesome oem extra! lol


It's something you can do for much much less... Check out my solution:

ofey wrote:I'm posting this again. It seems my original DIY has disappeared.

Whilst speaking to hansmitchel yesterday I told him there was already a diy for this which I submitted but strangely I can't find it on the site.

So here's how I neon-ed my front grill again which I posted ages ago on the lancerzone forums:

So I saw Freddie's post and the JDM accessories catalogue for their Galant Fortis:
Image

I was keen to get this done.
Unlike Bro Freddie and the Japs, I used a neon tube as opposed to LEDs.

My neon tube was bought from a local company [url="http://www.aerpro.com.au/list.php?pcode=NE24B&cat_name=mobile%20lighting&cat_no=01&cat_sno="]Aerpro. 24" long[/url], water resistant and costing A$18/- after 20% discount.

And unlike Bro Freddie and the Japs, I wanted 2 ways for the nose background light to come on:
a) When the door of the car opened, so triggered by dome light circuit; &
b) An override switch next to the ASC switch, so I could turn it on when I wanted e.g. chasing down someone in the night

So I had to design an auto electronic circuit for this. Using 2 x 4 pin relays (A$10.00) , a 3m length of wire (F.O.C. take from Science Labs) to tap my battery and for jumper wire, I pulled them into the car cabin through the hole in the driver wheel arch.

I also had to tap my dome light circuitry which I found behind the panel where your front bonnet opening lever is to act as the trigger for the neon. You will also need a diode (1N4002 about A$0.25) and a capacitor (~50uF about A$0.25) to do this.

I used a 34.5x20mm switch (A$2.50) which fits perfectly in place of the dummy swith next to the ASC button as the override and a couple of 10A in line fuses (A$4.00) to complete the circuit.

I also used 8 cable ties (A$2.00), some 3M industrial double sided tape (bought for other projects), both to attach my neons behind the license plate so the glow directed towards the radiator and some plastic wiring shell to protect the exposed wiring in the engine bay (10m for A$2.50).

Here is my pin out guide for the relay assembly. (Sorry too lazy to draw it out but if you need me to send PM)
Relay 1 (To Neon):
Pin 30 = 12V Batt through 10A fuse (Line1)
Pin 85 = Grounded to body
Pin 86 = from both Pin87 Relay2 & Acc from switch
Pin 87 = to neon

Relay 2 (from dome light circuit):
Pin 30 = 12V from Batt through 10A fuse (Line2)
Pin 85 = to (gnd) of dome light circuit
Pin 86 = to (+) of dome light circuit
Pin 87 = to Pin 86 Relay1
also solder the capacitor between Pin85 & 86 to prevent chattering of the relay as the dome light circuit dims down

Switch (LED on switch best so you can see if it is on)
Power =12V from Batt through 10A fuse (Line2)
Acc = to Pin 86 Relay1 through diode
Ground = Body of car

Lots of protection from the fuses and the fact that a cascaded relay arrangement will protect the wiring I set up and the car's own.

Here's an image of my override switch:
Image

and during operation (driver door open so dome light circuit triggers neon):
Image

So total damage < A$50/- !! Way cheaper than the Japanese quotes of Y28,350 (~ A$404.75)


And yes I've already started asking about a group buy but it is apprently a public holiday here... .


Are you Macgyver?

You make it sound so easy like you did it with your eyes closed. I'm still stuck on 'get a neon tube'.....


But I am interested in that double lid that everyone is raving about. Do you know if it comes with different materials on the cover? I have the standard black VRX cloth interior.
Moonshiners put more time, energy, thought, and love into their cars than any racer ever will. Lose on the track, and you go home. Lose with a load of whiskey, and you go to jail. – Junior Johnson, NASCAR legend, and one time whiskey runner.


Return to “General Talk”

Who is online

Users browsing this forum: No registered users and 94 guests