REVERSE PARKING SENSORS
Posted: Fri Apr 30, 2010 7:42 pm
Last year I set-out to find the best After-market Reverse Parking System available for purchase in Australia.
When I say best, I'm referring to the Design/Build and Assembly Standard of the Main Control Unit, the Sensors Quality, Innovation and Features, Pre/After Sale Technical Back-up, Price & Warranty and availability to Spare Parts in the event of Rear Collision Incident.
So after spending a considerable amount of time Net Surfing, Phoning (STD & OS), Driving and Emailing, "I believe" I have found a product that outperforms most on the Australian market.
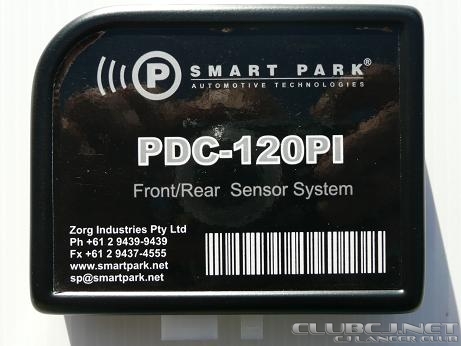
Smart Park PDC120PI (Parking Distance Control 120 Push In - Sensors) by Zorg Industries Pty Ltd.
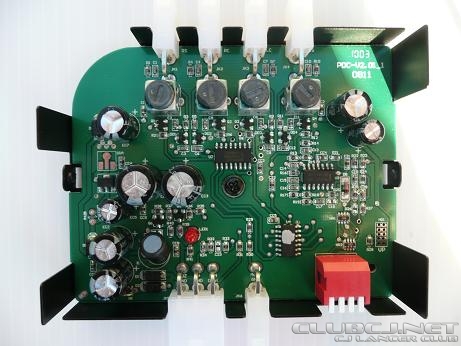
MAIN CONTROL UNIT
EXTERNAL 95mm x 75mm & INTERNAL PCB (full metal enclosure)
-------------------------------------------------------------------------------------
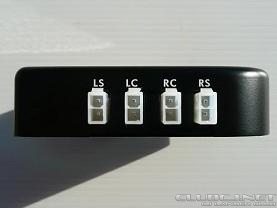
SIDE VIEWS - PLUG-INS & PROGRAMMABLE DIP SWITCHES
 -----------
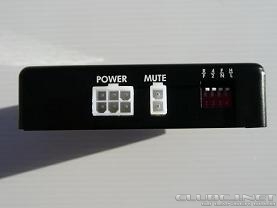 -----------
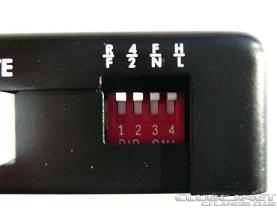
These 4 Dip Switches allow the user to adjust the desired Set-Up and Parameters.
F/R = Front or Rear Bumper Mounted Sensors.
4/2 = Number of Sensors Used.
F/N = Detection Range (Full - 2.1m) (Normal - 1.5m).
H/L = High or Low Sensitivity
-------------------------------------------------------------------------------------
SENSORS & MUTE BUTTON
 --
--
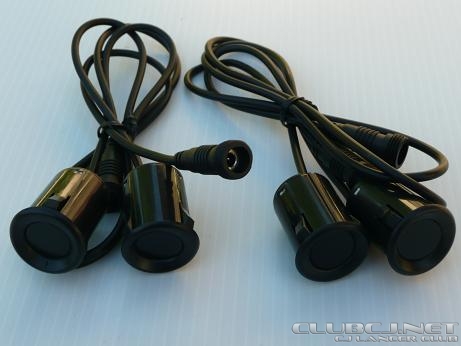
Sensors are Low Profile High-End Units (Note: Longer Body Housing & Screw Fit Weather Proof Connectors) (20mm Mounting Hole)
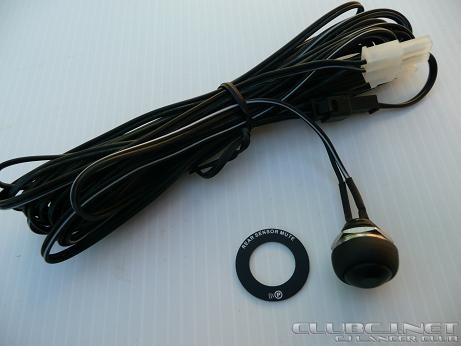
Mute Button: Can be used to Temporarily Mute the System in the event of a Known Obstruction for which you Do-Not require Alert Attention.
(Fitting is Optional and Non Fitment does not alter or effect the Systems Operation)
-------------------------------------------------------------------------------------
STANDARD SPEAKER/BEEPER ------- OPTIONAL VISUAL CONTROL DISPLAY VCD-110
 -
-
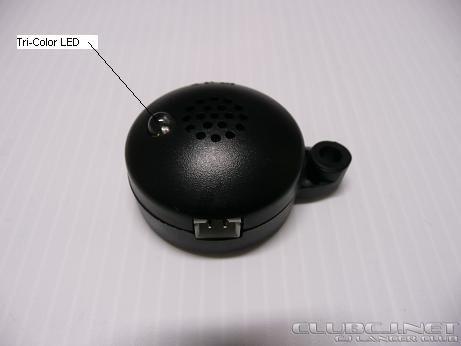
The Standard Speaker/Buzzer has a Tri-Color LED and can be screw or Velcro mounted.
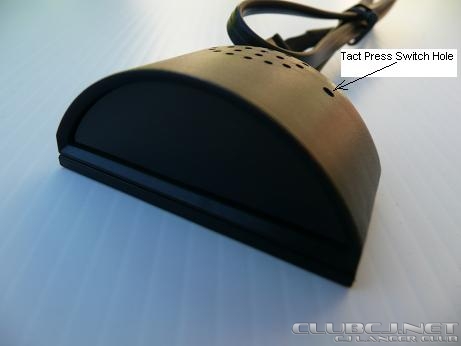
The Optional Visual Control Display Unit VCD-110 is Fully Programmable via the Tact Press Switch Hole.
Dimensions = 44mm Wide x 30mm Deep x 18mm High -- Half Moon Shape.
Adjustable Display Settings / Functions Include:
Beeper Volume.
Tone Selection.
Display Brightness.
Digit Display - Right Side-Up or Up-Side Down.
Distance Measurement - Feet or Meters.
Alarm Zone - Solid or Flashing.
First Distance Detection Zone - Audible or Silent.
-------------------------------------------------------------------------------------
INSTALLATION IN YOUR LANCER
POWER CONNECTION
 -
-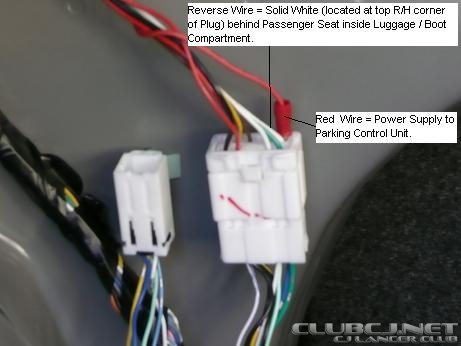
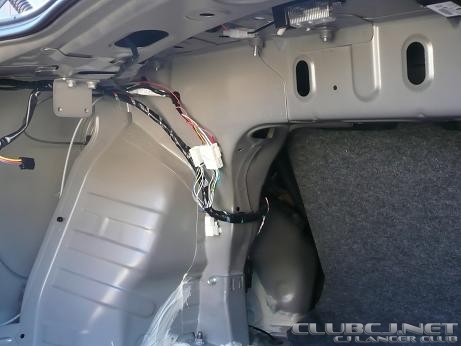
The Power Supply Wire (solid white - top R/H corner of plug) for your Reverse Lights is located behind the L/H Rear Passenger Seat in the Luggage/Boot Compartment.
MAIN CONTROL UNIT PLACEMENT
 -
-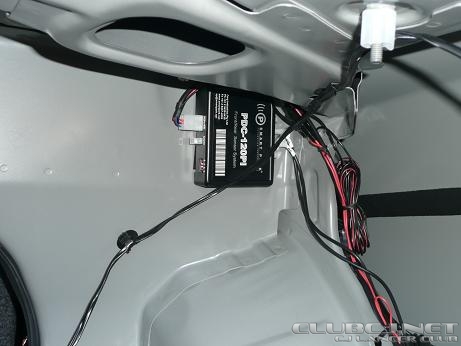
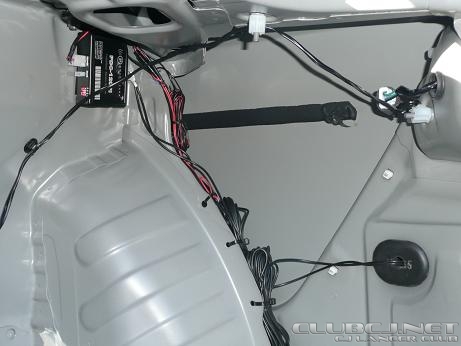
I chose to install the Main Control Unit just below the Parcel Shelf on the R/H side of the Boot. The wiring is secured via zip-ties in the holes along the wheel arch seam and the Sensor Wires run through a hole punched in the larger Rubber Grommet on the Inner Guard Panel.
Once the Boot Lining is re-installed, the entire installation is completely hidden and un-obtrusive as is the genuine OEM fitment.
VISUAL CONTROL DISPLAY UNIT PLACEMENT.
 ---
--- ---
--- ---
---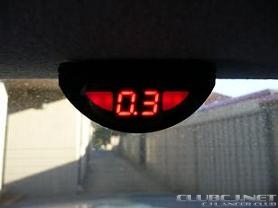
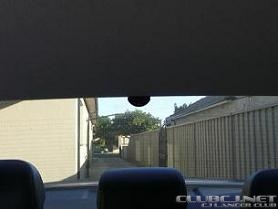
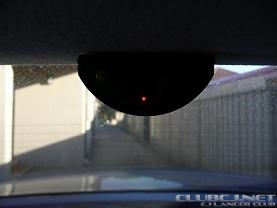
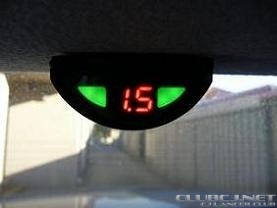
I chose to mount the VCD upside down on the flat section of the Head Lining just where it meets the Rear Windscreen. (used Thick Double-Sided Tape)
The wiring is discreetly tucked inside the Headlining and run across to the drivers side and tucked in behind the Air-Bag Panel and down through a hole which leads into the boot adjacent to the main Control Unit.
The VCD displays 3 Zone Detections:
Zone 3 -- Green -- 0.8m-1.5m in Normal Range........1.0m-2.1m in Full Range.
Zone 2 -- Amber -- 0.8m-0.4m in Normal Range........1.0m-0.4m in Full Range.
Zone 1 -- Red ----- 0.4m-0m in Both Ranges.
SENSOR INSTALLATION
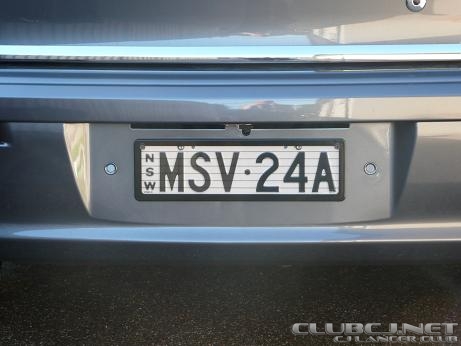
I chose to mount only 2 Sensors in the Rear Bumper.
Reason being is that the detection area of Ultra Sonic Sensors resembles an open Hand Fan. 2 sensors mounted centrally will suffice detection to the outer edges of the vehicle. Extra sensors mounted close to the outer ends of the bumper will only detect unnecessary peripheral objects which extend beyond the vehicles perimeter which can lead to miss-guided alerts.
However, the choice is entirely yours 2 or 4 sensors.
Try 2 at first and gauge the sensor range as per your requirements.
If not sufficient, then add another 2 in an suitable place.
WIRING DIAGRAM
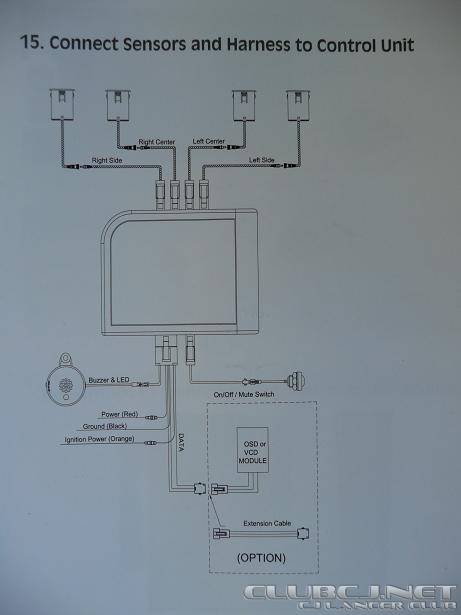
Ignition Power Orange Wire need only be connected if you decide to use the Mute Button mentioned previously.
FEATURES
3 Year Manufacturers Guarantee.
2 or 4 Sensor / Front or Rear.
Automatic Rear Activation.
Adjustable Range and Sensitivity.
Installs into Plastic or Metal Bumpers .
Self Learning capability to ignore vehicle mounted objects.
eg: Tow Bar, Rear Mounted Wheel, Bicycle Rack etc.
Auto-mute function for use when Towing.
Optional Adjustable Audio/Visual Display Unit.
Low profile, small diameter Sensors.
ABS plastic Sensor housings, designed for painting.
Self-diagnostic check on start-up.
CONCLUSION
I know there are many other brands in the market place such as: Cellpak, Proxel, Dynamco, Steelmate, Tresorplus, Bosch, Hella, Mongoose, Ploaris, Axis, Park Dynamics, Carkitco, and Mitsu’s OEM Lumen.
I have viewed and researched most of these brands personally / physically and via electronic correspondence and found that most are only generic Asian units sourced and re-branded via after-market logos and sold for none other than a quick business buck. When confronted with Technical and/or After Sales questioning, many simply failed and were unable to supply much more than could be read on the packaging box.
I'm not stating or implying in any manner that these brands are inferior, but most are only reasonably adequate and do not equate to the build quality and design features found in the Smart Park unit.
The only brand available on the Australian Market worthy of comparable quality is the Bosch Park Pilot unit priced at approx $600. At this price, most Auto Elect Outlets won't even keep one on the shelf, and even it doesn't include the same features found in the Smart Park unit.
Since this product has been primarily aimed at the Commercial Automotive Sector it is not readily found in the Retail Marketplace. It can be ordered through some Bursons Auto Outlets who source it from a major Electronic Distribution Centre called Cooldrive Distribution who have an outlet based in every state of Australia.
I am currently in communication with the National Sales Manager of Zorg Industries with reference to direct purchasing and pricing.
PS: As it occurred with my in-depth posts on Pedders Coilovers and Whiteline Swaybars.
I state affirmatively, I do not and never have had any affiliation with Zorg Industries.
I just have this crazy addiction for research into products I set my intentions on. I thrive on it so much I wish sometimes I could just say no and stop, but I cant until its complete.
Sure I benefit from my pursuit of product excellence with the satisfaction of ownership and usefulness, however the feeling of sharing my research is equally satisfying.
So please don't judge, I'm only trying to benefit the accepting members of this club with products I find in my opinion worthy of announcement.
Cheers: Sam
When I say best, I'm referring to the Design/Build and Assembly Standard of the Main Control Unit, the Sensors Quality, Innovation and Features, Pre/After Sale Technical Back-up, Price & Warranty and availability to Spare Parts in the event of Rear Collision Incident.
So after spending a considerable amount of time Net Surfing, Phoning (STD & OS), Driving and Emailing, "I believe" I have found a product that outperforms most on the Australian market.
Smart Park PDC120PI (Parking Distance Control 120 Push In - Sensors) by Zorg Industries Pty Ltd.
MAIN CONTROL UNIT
EXTERNAL 95mm x 75mm & INTERNAL PCB (full metal enclosure)


-------------------------------------------------------------------------------------
SIDE VIEWS - PLUG-INS & PROGRAMMABLE DIP SWITCHES
 -----------
 -----------
These 4 Dip Switches allow the user to adjust the desired Set-Up and Parameters.
F/R = Front or Rear Bumper Mounted Sensors.
4/2 = Number of Sensors Used.
F/N = Detection Range (Full - 2.1m) (Normal - 1.5m).
H/L = High or Low Sensitivity
-------------------------------------------------------------------------------------
SENSORS & MUTE BUTTON
 --
--
Sensors are Low Profile High-End Units (Note: Longer Body Housing & Screw Fit Weather Proof Connectors) (20mm Mounting Hole)
Mute Button: Can be used to Temporarily Mute the System in the event of a Known Obstruction for which you Do-Not require Alert Attention.
(Fitting is Optional and Non Fitment does not alter or effect the Systems Operation)
-------------------------------------------------------------------------------------
STANDARD SPEAKER/BEEPER ------- OPTIONAL VISUAL CONTROL DISPLAY VCD-110
 -
-
The Standard Speaker/Buzzer has a Tri-Color LED and can be screw or Velcro mounted.
The Optional Visual Control Display Unit VCD-110 is Fully Programmable via the Tact Press Switch Hole.
Dimensions = 44mm Wide x 30mm Deep x 18mm High -- Half Moon Shape.
Adjustable Display Settings / Functions Include:
Beeper Volume.
Tone Selection.
Display Brightness.
Digit Display - Right Side-Up or Up-Side Down.
Distance Measurement - Feet or Meters.
Alarm Zone - Solid or Flashing.
First Distance Detection Zone - Audible or Silent.
-------------------------------------------------------------------------------------
INSTALLATION IN YOUR LANCER
POWER CONNECTION
 -
-
The Power Supply Wire (solid white - top R/H corner of plug) for your Reverse Lights is located behind the L/H Rear Passenger Seat in the Luggage/Boot Compartment.
MAIN CONTROL UNIT PLACEMENT
 -
-
I chose to install the Main Control Unit just below the Parcel Shelf on the R/H side of the Boot. The wiring is secured via zip-ties in the holes along the wheel arch seam and the Sensor Wires run through a hole punched in the larger Rubber Grommet on the Inner Guard Panel.
Once the Boot Lining is re-installed, the entire installation is completely hidden and un-obtrusive as is the genuine OEM fitment.
VISUAL CONTROL DISPLAY UNIT PLACEMENT.
 ---
--- ---
--- ---
---
I chose to mount the VCD upside down on the flat section of the Head Lining just where it meets the Rear Windscreen. (used Thick Double-Sided Tape)
The wiring is discreetly tucked inside the Headlining and run across to the drivers side and tucked in behind the Air-Bag Panel and down through a hole which leads into the boot adjacent to the main Control Unit.
The VCD displays 3 Zone Detections:
Zone 3 -- Green -- 0.8m-1.5m in Normal Range........1.0m-2.1m in Full Range.
Zone 2 -- Amber -- 0.8m-0.4m in Normal Range........1.0m-0.4m in Full Range.
Zone 1 -- Red ----- 0.4m-0m in Both Ranges.
SENSOR INSTALLATION

I chose to mount only 2 Sensors in the Rear Bumper.
Reason being is that the detection area of Ultra Sonic Sensors resembles an open Hand Fan. 2 sensors mounted centrally will suffice detection to the outer edges of the vehicle. Extra sensors mounted close to the outer ends of the bumper will only detect unnecessary peripheral objects which extend beyond the vehicles perimeter which can lead to miss-guided alerts.
However, the choice is entirely yours 2 or 4 sensors.
Try 2 at first and gauge the sensor range as per your requirements.
If not sufficient, then add another 2 in an suitable place.
WIRING DIAGRAM

Ignition Power Orange Wire need only be connected if you decide to use the Mute Button mentioned previously.
FEATURES
3 Year Manufacturers Guarantee.
2 or 4 Sensor / Front or Rear.
Automatic Rear Activation.
Adjustable Range and Sensitivity.
Installs into Plastic or Metal Bumpers .
Self Learning capability to ignore vehicle mounted objects.
eg: Tow Bar, Rear Mounted Wheel, Bicycle Rack etc.
Auto-mute function for use when Towing.
Optional Adjustable Audio/Visual Display Unit.
Low profile, small diameter Sensors.
ABS plastic Sensor housings, designed for painting.
Self-diagnostic check on start-up.
CONCLUSION
I know there are many other brands in the market place such as: Cellpak, Proxel, Dynamco, Steelmate, Tresorplus, Bosch, Hella, Mongoose, Ploaris, Axis, Park Dynamics, Carkitco, and Mitsu’s OEM Lumen.
I have viewed and researched most of these brands personally / physically and via electronic correspondence and found that most are only generic Asian units sourced and re-branded via after-market logos and sold for none other than a quick business buck. When confronted with Technical and/or After Sales questioning, many simply failed and were unable to supply much more than could be read on the packaging box.
I'm not stating or implying in any manner that these brands are inferior, but most are only reasonably adequate and do not equate to the build quality and design features found in the Smart Park unit.
The only brand available on the Australian Market worthy of comparable quality is the Bosch Park Pilot unit priced at approx $600. At this price, most Auto Elect Outlets won't even keep one on the shelf, and even it doesn't include the same features found in the Smart Park unit.
Since this product has been primarily aimed at the Commercial Automotive Sector it is not readily found in the Retail Marketplace. It can be ordered through some Bursons Auto Outlets who source it from a major Electronic Distribution Centre called Cooldrive Distribution who have an outlet based in every state of Australia.
I am currently in communication with the National Sales Manager of Zorg Industries with reference to direct purchasing and pricing.
PS: As it occurred with my in-depth posts on Pedders Coilovers and Whiteline Swaybars.
I state affirmatively, I do not and never have had any affiliation with Zorg Industries.
I just have this crazy addiction for research into products I set my intentions on. I thrive on it so much I wish sometimes I could just say no and stop, but I cant until its complete.
Sure I benefit from my pursuit of product excellence with the satisfaction of ownership and usefulness, however the feeling of sharing my research is equally satisfying.
So please don't judge, I'm only trying to benefit the accepting members of this club with products I find in my opinion worthy of announcement.
Cheers: Sam