***** ALERT - Nominations for your new ClubCJ Committee can be made here *****

Chrome Front Bumper

Exterior Parts/Accessories & Modifications.

Moderators: Moderators, Senior Moderators

User avatar
Aspired
Lancer Ralliart
Lancer Ralliart
Posts: 682
Joined: Tue Jun 23, 2009 11:11 pm
Location: Melbourne, VIC, Australia

Postby Aspired » Sun Nov 08, 2009 5:17 pm

Here's my third attempt, which I'm still not happy with, but got sick of trying so I have left this attempt on, just to see how long it lasts.

Image Image

I cut out the tow plug to see how it would look and I think its better cut out.

Image

User avatar
LZY_EYE
Genius
Genius
Posts: 6382
Joined: Mon Jun 29, 2009 10:12 am
Location: Central Coast, NSW

Postby LZY_EYE » Sun Nov 08, 2009 5:28 pm

That looks awesome Aspired!!

It will be interesting to see how long it lasts. I was tempted to go with the chrome vinyl and see how it goes too.

User avatar
Ozie
INACTIVE Member Account
Posts: 5445
Joined: Mon Sep 22, 2008 7:00 am
Location: Sydney, NSW, Australia

Postby Ozie » Sun Nov 08, 2009 6:36 pm

That Looks unreal,
i know a lot of Members who will be interested in this. +1.

User avatar
scraverX
Lancer MASTER
Lancer MASTER
Posts: 1590
Joined: Fri Oct 30, 2009 8:12 am
Location: Canberra, Australia
Contact:

Postby scraverX » Sun Nov 08, 2009 6:49 pm

Hmmm... chrome or stick with the 'ninja' black theme I had in mind. Choices choices. Problem is I see 'too many' beemers, audi's and vw's owned by "rich kids" blinging the chrome grill, rims and whatnot on black or other dark coloured cars.
"Max" 2009 MY10 RX, Black. CCJ Lifetime Premium Member #0125
Car & Home audio nut.
Car audio brands used: Audison, Eclipse, Hybrid Audio Technology, Precision Power, Polk Audio, Pioneer PRS
Home Audio: Denon, Epos, Pro`ject, AKG

User avatar
tadz0rz
Genius
Genius
Posts: 6955
Joined: Sun Mar 08, 2009 8:54 pm
Location: Melbourne, VIC, Australia
Contact:

Postby tadz0rz » Sun Nov 08, 2009 7:39 pm

Thats sick looking man!!

How long do you expect it to last?
Got a question? Read the ClubCJ Ultimate Guide First!!
Image
Just...Dont worry about it ;)Dont Click Me

User avatar
aspir3
Site Admin
Site Admin
Posts: 8415
Joined: Tue Oct 27, 2009 6:15 pm
Location: adelaide

Postby aspir3 » Sun Nov 08, 2009 8:28 pm

Aspired that looks great. Now we need all the details, you can not be the only Lancer with an awesome chromed front grill. What brand of vinyl, did you fit it wet or dry, how did the vinyl stretch on the corners, does it look like real chrome, any idea how long it will last, how much and where did you purchase vinyl from?
Sorry for all the questions, but I like all the info before I have a go! I might wait and do it during Christmas break.

User avatar
spareparts
Lancer Ralliart
Lancer Ralliart
Posts: 662
Joined: Wed Apr 08, 2009 5:36 pm
Location: Mt Druitt, NSW, Australia

Postby spareparts » Sun Nov 08, 2009 8:57 pm

thats looks sweet....
the voices may not be real, but they have some pretty good ideas :D:D
Image
..... If streets could talk they would Beg For Mercy!!! 151.6kw & 330nm @ all 4 paws .....

User avatar
bungfritz
Lancer ES/EX
Lancer ES/EX
Posts: 107
Joined: Sat Jan 31, 2009 7:52 pm
Location: Adelaide, SA, Australia

Postby bungfritz » Sun Nov 08, 2009 9:35 pm

Looks very nice, good job. Sorta reminds me of a VW front with the whole front section chromed out.

User avatar
Aspired
Lancer Ralliart
Lancer Ralliart
Posts: 682
Joined: Tue Jun 23, 2009 11:11 pm
Location: Melbourne, VIC, Australia

Postby Aspired » Sun Nov 08, 2009 9:39 pm

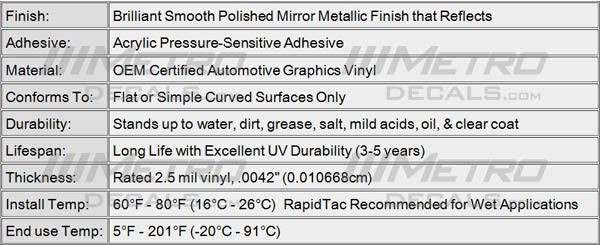
I bought it from MetroDecals.com. Life span is 3-5 years and can do 4 bumpers. Cost me $27

Here are the specs:
Image

Here is my before shot:
===============
Image

My first attempt:
===========
I grabbed my almost empty bottle of Meguiars Quick Detailer and used that as a lubricant to make it easier to apply. Well that didn't lubricate to well, it works fine as a lube with a clay bar but not vinyl. It didn't lube at all. I peeled off the backing and placed the vinyl on the bar and it stuck straight away and didn't slide at all. Lucky I stuck it on pretty straight. The Meguiars did make it a bit easier to peel the vinyl off, but when I did peel it off a bit, the vinyl creased and left a white mark like a scratch, this would be covered by the numberplate, so I kept going.

In the end there were a few creases left towards the centre that extended above and below the number plate, but the sides didn't look too bad, except around the tow plug were I tried to use the hair dryer to shrink the vinyl to remove some bubbles. Bad move, using the hair dryer was like using a blow torch on plastic, as I pointed the hair dryer towards the bar, the vinyl turned a bit white and shrivelled up a bit.

Here's a pic of my first attempt:

Image

This didn't take too long and I figured using soapy water would make it easier, so I peeled it all off, ready for another go in the morning.

My second attempt:
=============
In my first attempt, I had lots of creases in the middle of the bar. The bar looks flat and straight, but its not and this stuff does not stretch and creases very easily. I figured if I cut out the centre bit which will be covered by the number plate it would make it easier and I will get less creases. I cut out the centre and this time used soapy water. The soapy water did allow the vinyl to slide on the bar, the problem was, it slid too well and I could not get the vinyl to stick in places and it kept moving and lifting, creating way too many bubbles.

I had more vinyl so I decided I would use this attempt as a test for the tow plug cut out. I wanted to see if I could get a nice cut out of the plug. I tried it and it wasn't too hard, so I decided on the next attempt I would cut out the plug. I slid this bit of vinyl off the bumper and tossed it in the bin.

No pic of this failed attempt.

My third attempt:
===========
Well, cutting out the centre helped and cutting out the plug seemed to work aswell, but the soap didn't really make it easier. Out of the previous attempts, my first application worked out better, so I decided to go the Meguiars route again, I still had a little left.

I wet the bumper down peeled off my newly cut sheet and placed it on the bumper like I did the first time, but not as straight this time.... What a nightmare. I slowly started working the vinyl with my Medicare card covered in a microfibre towel and it started looking good. No creases on the sides, as I was pushing them towards the centre off the bar, to be covered by the number plate.. Pretty happy with my efforts so far, Then my wife calls out that its almost time to go --We had a birthday party to go to-- So I started speeding up a bit, but not to fast.

Sides were looking good, so I started cutting off the extra bits from one side... still looking good, then the other side, I cut out the tow plug hole, then the bottom... pretty happy with my self I went to cut the top and thats when I saw it was a little short in the middle... NOOOO I"M NOT DOING THIS AGAIN !!!!! and all I hear in the background is my wife shouting "Hurry Up Lets Go" So I grabbed a cut off piece from the bottom and stuck it in the middle accross the top of the bar and said "f@#k it, its good enough"

At the party I kept thinking about how to make it easier... it can't be that hard to do... Surely someone makes a damm flat bumper cap that I can buy and get chromed.

After the party(a kids 4th birthday) I was scared to look at what I had done to the car, but once the grill was in and the number plate was on, it didn't look too bad so I left it on...
But not happy with the result.

Well I have one more strip of vinyl left, but I really don't feel like doing it all over again now... Maybe in a few weeks I might try one more time with a second pair of hands. It's really hard trying to do this on your own.

And the pics of my third attempt:
The ones in the first post.

In the first pic you can see my ClubCJ decal in the engine bay.
I get an extra 10kw from that :lol:

User avatar
ofey
Alumni
Alumni
Posts: 8582
Joined: Mon Oct 27, 2008 8:56 pm
Location: Melbourne, VIC, Australia
Contact:

Postby ofey » Sun Nov 08, 2009 9:46 pm

What drama!!

Goran man, you really shouldn't have done 3 attempts in a single weekend!!
Beeble tooned MY08 OEd. w/ RA BKit+SWheel
Cosworth Panel Filter w/ RA Intake | SuperCircuit 4-2-1 Headers | Creat’d Ti-tipped SS exhaust
BC BR-type Coilovers | UR + Whiteline Bars
EBC GreenStuff Pads | RDA Rotors

User avatar
LZY_EYE
Genius
Genius
Posts: 6382
Joined: Mon Jun 29, 2009 10:12 am
Location: Central Coast, NSW

Postby LZY_EYE » Sun Nov 08, 2009 9:51 pm

Yeah, you are a glutten for punishment aren't you!!

Thanks for the rundown on your dramas. I am thinking of using this vinyl on the rear behind the number plate too.

SIR-VRX
Genius
Genius
Posts: 7244
Joined: Mon Oct 06, 2008 11:16 pm
Location: Brisbane, QLD, Australia

Postby SIR-VRX » Sun Nov 08, 2009 11:11 pm

Looks good mate!

User avatar
Graham
Post Monster
Post Monster
Posts: 3021
Joined: Mon May 18, 2009 6:08 pm
Location: Perth

Postby Graham » Mon Nov 09, 2009 7:46 am

I like it :)

I know how you feel when it comes to putting vinyl on the front bumper, it's a pain, but patience is a virtue. I hope this one stays on, it looks great
Four wheels move the body, two wheels move the soul.
ImageImage
Daily Driver: Yamaha R1
Weekend Warrior: BMW Z4 Roadster


Return to “Exterior”

Who is online

Users browsing this forum: No registered users and 16 guests