

Alternatively go for a GReddy Informeter Touch
***** ALERT - Nominations for your new ClubCJ Committee can be made here *****
Custom Instument Faces
Moderators: Moderators, Senior Moderators


-
matchstick
- Lancer Learner

- Posts: 17
- Joined: Mon Oct 05, 2009 8:10 pm
- Location: Colton, Ca. USA
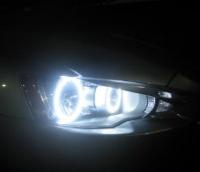
Actually the LEDs behind the the Speedo and TAC are indeed white.
On the GTS (VRX) and lower there are 3 leds behind each dial. the RA and EVO X have 6.
The LCD display has 6 LEDs , 3 amber and 3 red.
The climate controls and radio are Amber LEDS. All the leds are SMD (surface mount).
We have had people here in the US actually swap out the LEDs with blue and white one. The LCD is by no means easy at all.
Here is the link to the guy that figured it out. http://www.evoxforums.com/forums/showthread.php?t=25766&page=8
And here are some pics.


as i said buy me a rework station, and i will do it for you. hell id do it for free if you buy me one lol. only cause a proper one cost >2grand lol
but if anyone is willing to let me have ago at changing there dash led's i dont mind trying, (of course i wont be replacing it if i stuff it). im already buying a rework station and a proper solderer soon anyway.
but if anyone is willing to let me have ago at changing there dash led's i dont mind trying, (of course i wont be replacing it if i stuff it). im already buying a rework station and a proper solderer soon anyway.


Blakey wrote:smithsy wrote:Whilst that ones an Evo one I think, the newer MY10 Lancers have redesigned dashes that are more similar in appearance to that one IIRC (obviously they dont have upto 300 on them lol)!
Yes they are white LEDs which are surface mounted to a PCB. If you know someone who does hot solder reflow work you could change the LEDs with ones from a different colour ordered from somewhere like Farnell or RS Electronics, but it's not an easy task. As for a new dash face, on option would be getting printed/cut vinyl onto a thin plastic but it wouldn't be easy...
Actually, the changing of the LED's in the dash if you have a proper desolder/rework Iron, then the job is extremely easy, if you know what your doing. if you have the rework head for the specific LED's its even easier. if someone wants to buy my a proper rework solder iron, i will gladly change peoples dash LED's, its very easy, IF you have the gear.
it would only be time consuming cause there is hundreds.
And do you or any members have a a rework solder station? Not likely, hence why it is quite hard to so with a normal soldering iron and even soldering paste!
Even with a rework station I daresay it's not something the average person could just pick up and get right the first time (it I daresay would take you some time and practise), not too mention if you stuff up then those dash clusters are gonna cost you a bomb!
smithsy wrote:Blakey wrote:smithsy wrote:Whilst that ones an Evo one I think, the newer MY10 Lancers have redesigned dashes that are more similar in appearance to that one IIRC (obviously they dont have upto 300 on them lol)!
Yes they are white LEDs which are surface mounted to a PCB. If you know someone who does hot solder reflow work you could change the LEDs with ones from a different colour ordered from somewhere like Farnell or RS Electronics, but it's not an easy task. As for a new dash face, on option would be getting printed/cut vinyl onto a thin plastic but it wouldn't be easy...
Actually, the changing of the LED's in the dash if you have a proper desolder/rework Iron, then the job is extremely easy, if you know what your doing. if you have the rework head for the specific LED's its even easier. if someone wants to buy my a proper rework solder iron, i will gladly change peoples dash LED's, its very easy, IF you have the gear.
it would only be time consuming cause there is hundreds.
And do you or any members have a a rework solder station? Not likely, hence why it is quite hard to so with a normal soldering iron and even soldering paste!
Even with a rework station I daresay it's not something the average person could just pick up and get right the first time (it I daresay would take you some time and practise), not too mention if you stuff up then those dash clusters are gonna cost you a bomb!
hell i could do it with a soldering iron. dont need a rework station.
even if you do happen to lift a pad everything can be fixed, i have fixed burn holes in boards, relain traces, everthing in board repare, except multilayer boards, that arent commonly used in new boards anyway.
I personally, would find no trouble with solderwork and rework. i do it a fair bit, as i said before, with the right tools, The changing of led's on the dash cluster PCB is easy.
hell i would do my own if i had the time to pull it out and time to work on it, but i dont i need to use my car to much so i cannot remove my cluster to work on it for long enough.
Graham wrote:sooo tempting to try...
I'm thinking of it with one of the LED's behind like the "240" to start with maybe so if I do mess it up it may not matter so much
Graham, the only trouble you will have is getting the LED's off, you will either need a specalized solder tip to get both sides at once, or have alot of calming time to remove them. if you are rough you will lift a pad when removing, its takes literally a few seconds to solder stuff, so if you have the iron on anylonger, you will run the risk of damaging the componant.
the boards are usually quite tuff, being made of FR4 basically fiberglass. it gives you a bit more leananecy with the heat, componants dont, if you fry a IC, then you will need to replace it or buy a new dash cluster.(i know your not changing them, but you can still overheart the area and fry a IC from a trace.
the way i suggest you try to remove the LED's is look at the board, and look at the solder. work out if it is leaded or leadfree, leaded will be shiney like its wet, and leadfree with be a dull shine.
you do this to work out what teampreature you need your iron. if you cant set teampreature, and the solder is leadfree and you cant get the heat, then you will burn your board and run the risk of frying something.
common teampreature for 60/40 leaded solder is 190 degrees
and leadfree solder usually is around 230-240, depending on the makeup of the solder.
to remove the LED without a specialised tool, you need to melt the solder on each side to remove it, to do this you need to heat the solder till it melts on one side, once it has melted after like 1s melt the other side once both sides have been melted keep swapping back and forth between sides wile very very very lightly nudging the LED you dont want to force it off or rip it off you will lift a pad. most common time to lift a pad is removing componants caues you are to rough.
best way to do it is rest a pair of tweezers on your hand and against the LED, dont hold the tweezers, just rest on top. as you heat both sides bring your hand closer, but dont grab on the tweezers just let them get a steeper angle in your hand(not so steep they fall over the other side of your hand...), it will be enough to push the led away when its free from the pad and solder. this method will most likly destroy the LED(cause of heat), but it will leave your board in a good condition.
when you are ready to put your new LED down, seeing as they are quite small, magnifying would be usefull.
first thing you want to do, is clean your pads on the PCB, with some desolder wick. looks like a very fine copper braid. once that is done you want to tin your pads, Ie put a small ammount of solder on the pads both pads or just one doesnt comptly matter, just do one will make the led sit better.
once you have tinned your pad, pick up your LED in your tweezers put it on top of your 1 tinned pad, now holding your LED to the tinned pad melt the solder and hold the led flat againts your board, remove the heat after 1-2sec and dont move the LED or you will make a bad solder joint, once that side is soldered good, and straight if you have to straighten the LED use your tweezers and remelt the one side that is holding it soldered and nudge your led straight,,if you can do it in 2sec take heat off and let it cool down, or you run the risk of frying your led.
once you are happy with how straight it is(70% on the pad is acceptible to standards)(not that the standards really applie to hobby works)
but yes once it is straight, you can solder your other side now, using a small ammount of solder instead of trying to add solder after heating(caues you will put way to much everyone will) put a small dab of solder on your iron, then wipe it on the joint from the LED going outwards, if you do it well you should get a nice slightly concave solder joint, if done correctly both sides should have this, if its not concave, you have put to much solder. if its not nice looking you havent heated long enough and you removed the heat to quickly causing bad wetting out of the solder and bad joint.
if it looks nice, get a multimeter(on diode tester) and check the LED still works. if it doesnt light up at all then you have fried it, or your leads are around the wrong way. swap sides if still no light you have fried it, if it lights up , congradulations you have changed one LED.
if you need any more help, just ask me. or look it up on the internet.
Who is online
Users browsing this forum: No registered users and 15 guests